
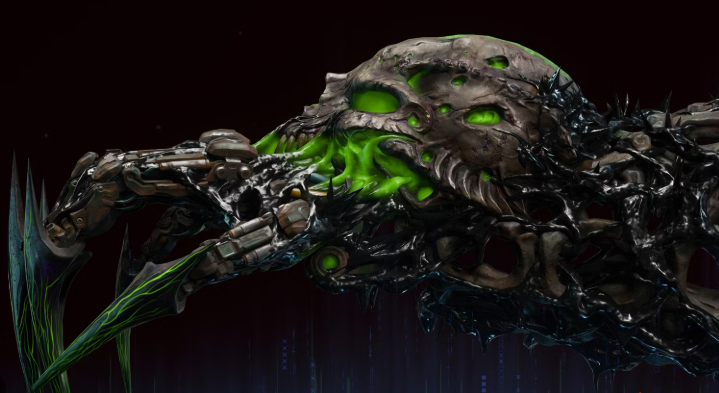
The Necrofluid Gauntlet is one of the premier Wonder Weapons in Call of Duty: Black Ops 7 Zombies, offering massive burst damage, elite-melting power, and incredible crowd control once fully upgraded. Like many Wonder Weapons in the Dark Aether saga, building it requires completing a multi-step Easter Egg with boss fights, puzzles, and high-stakes escort sections.
If you want the fastest, most reliable method to assemble the Necrofluid Gauntlet in Ashes of the Damned, this complete walkthrough covers every step – including Klaus’s key role, rune puzzle tips, the quickest route between power stations, and essential tricks for surviving the underground scan.
Whether you’re mastering Zombies progression naturally or grinding quickly through Call of Duty Black Ops 7 Bot Lobbies (or choosing to buy CoD Black Ops 7 Bot Lobbies for faster XP and camo farming), this streamlined guide ensures you get the Gauntlet in the shortest time possible.
Before You Begin: Preparation Tips for a Smooth Run
Before you dive into the Easter Egg steps, make sure you’re fully prepared:
Use Aether Shroud (Solo Players Only)
This Field Upgrade lets you safely complete the underground scan at Zarya Cosmodrome without getting overwhelmed. Pop it when the scan begins to avoid taking damage while holding position.
Klaus Is Mandatory – and Temporary
You’ll summon Klaus as part of the Gauntlet quest. He disappears after a short duration, but you can re-summon him using the radio outside his cell at any time.
Turn On the Power at All Three Stations First
You’ll need all stations active before charging the canister later. Restore power at:
·Ashwood
·Blackwater Lake
·Vandorn Farm
Pack-A-Punch Compatibility
The Necrofluid Gauntlet can be upgraded at Ol’ Tessie, turning it into an absolute monster.
Step-By-Step Guide to Unlocking the Necrofluid Gauntlet
Follow these steps for the fastest and most consistent crafting route.
1. Open the Sheriff’s Office in Ashwood
Head to Ashwood and unlock the Sheriff’s Office next to the Vulture Aid machine (500 points). Inside, you’ll find Klaus’s jail cell, which becomes crucial shortly.
2. Go to Janus Tower Plaza and Defeat the Uber Klaus
Enter Janus Tower Plaza via Blackwater Lake. As soon as you step inside, an Uber Klaus miniboss spawns.
·Defeat him quickly with explosives or Pack-A-Punched weapons.
·He drops the Stabiliser Chip – your first key item.
3. Install the Stabiliser Chip in Klaus’s Cell
Return to the Sheriff’s Office.
·Interact with the scanner panel next to Klaus’s cell.
·Insert the Stabiliser Chip and wait for the installation to finish.
4. Wake Klaus Using Stun Grenades
Once the scan is complete, you must activate Klaus.
Throw stun grenades inside the cell until he animates and starts following you.
5. Escort Klaus to Zarya Cosmodrome and Complete the Underground Scan
Travel with Klaus to Zarya Cosmodrome and head into the Support Systems underground.
You’ll see a locked canister behind glass:
1. Command Klaus to interact with the nearby control panel.
2. A red spotlight appears – stand inside it until the scan completes.
3. If solo, activate Aether Shroud when things get overwhelming.
4. If you step out too long, the scan resets next round.
Once it’s finished, grab the Canister.
6. Charge the Canister at All Three Power Stations
Take the canister to each power station and charge it by killing zombies near its receptacle.
The fastest path is:
1. Ashwood →
2. Blackwater Lake →
3. Vandorn Farm (ends in the basement)
When all three stations finish charging, head into the Vandorn Farm basement.
7. Activate the Eldritch Box in the Vandorn Farm Basement
Interact with the strange Eldritch Box to insert the charged canister. This begins the rune puzzle phase.
8. Identify the Runes from the Jump Pad Route
Go outside to Janus Tower Plaza and take the jump pad toward Vandorn Farm.
While airborne, look downward:
·Three glowing runes appear on the barn, farmhouse, and silo roofs.
·These symbols are random for every match.
Take a screenshot or photo – you only need to see them once.
9. Input the Runes Into the Eldritch Box
Return to the basement.
·Each side of the Eldritch Box has panels of selectable symbols.
·Input the three runes you saw (order does not matter).
·Once set, interact with the eye symbol on the back.
If correct, the box opens – revealing the Necrofluid Gauntlet.
10. Survive the Lockdown and Claim the Necrofluid Gauntlet
Picking up the Gauntlet triggers a lockdown event.
To complete it:
·Shoot the green orbs floating around the room.
·Reload to pull them toward you after damaging them.
·Complete all orb cycles to lift the lockdown.
Once done, you’re free – and now wielding one of the strongest Wonder Weapons in Black Ops 7 Zombies.
Final Tips for Using the Necrofluid Gauntlet
·Pack-A-Punch immediately to unlock its full potential.
·Charged attacks are phenomenal for clearing groups and staggering Elite enemies.
·Great for XP grinding, camo progression, and high-round survival.